↧
Another microDRUM ! (I am moved)

↧
DrumScope
Talking with friends who build pad DIY, I reflected on the difficulty of determining the quality of a homemade pad. And thus the difficulty of finding the best parameters to configure the microDrum. So I decided to create a new program that could help determine the best parameters.

It is not yet complete, for now determines ScanTime,Threshold and MaskTime, but I’m working.
If someone needs a hand, or simply wants to help me to test the program,must do so. Download Visual Analyzer, connect the pad to analyze to the input of the soundcard, and record 60 seconds of shots on the pad,with different dynamics, at distance of about a second (so that the signals do not overlap).
Save the data in a text file, and send them zipped by email. Will test the program with that data and see what happens. You can do it also for pads and cymbals Roland, Yamaha, etc. …
↧
↧
LCD: Love Cheap Drum? Light Coolest, Dammit!
I am working to LCD support (optional) but I want to reassure everyone that I will not change the PCB microDRUM but I am going to use the connectors at the top (unused ones close to the Arduino), as you can see from the photo. For testing I’m doing them on an old PCB prototype (the first one , look at word “N° 1″).

↧
DrumScope v0.1

I added this software to Download Page. If anyone is interested in the code write it in the comments (or on the forum) and I’ll try to upload on GitHub.
This version of DrumScope, using the algorithm of firmware 1.1 I have not yet released, but it can still be useful to analyze the DIY pads.
↧
The last step
![]()
We arrived, after nearly two years of development, the last barrier was broken. The microDrum firmware becomes Open Source. I think it’s an important step because the quality of microDrum no longer depend only on me but also by those who want to devote his time. So it is important that each of you publicize this project in order to bring together a larger number of developers. For version 1.1beta you will find all the code on GitHub. When deemed ready, I will compile the firmware for version 1.1 and release it in the pages of Downloads and pass on GitHub to version 1.2beta. It ‘a very simple way to manage code, but for now suffice.
↧
↧
LCD Schema
Sorry for the delay, I was busy with work. Here are the diagrams for connecting an LCD to microDRUM. The code to handle it is still incomplete, but I hope soon to have the time to finish it. I remind you that the LCD screen is optional and microDrum works fine without it, I added it because you asked me. 
A friend of mine is building a prototype of the box. According to his work, I will decide how and whether to create a specific PCB for the LCD screen.
↧
Arduino DUE (Updated)
Arduino DUE - Summary
| Microcontroller | AT91SAM3X8E |
| Operating Voltage | 3.3V |
| Input Voltage (recommended) | 7-12V |
| Input Voltage (limits) | 6-20V |
| Digital I/O Pins | 54 (of which 12 provide PWM output) |
| Analog Input Pins | 12 |
| Analog Outputs Pins | 2 (DAC) |
| Total DC Output Current on all I/O lines | 130 mA |
| DC Current for 3.3V Pin | 800 mA |
| DC Current for 5V Pin | 800 mA |
| Flash Memory | 512 KB all available for the user applications |
| SRAM | 96 KB (two banks: 64KB and 32KB) |
| Clock Speed | 84 MHz |

WARNING:
The current diagram of microDRUM is not compatible with the Arduino DUE. Even the code is not compatible because of the different processor.

I made the changes on a micro-microDRUM and seems to work. I will try to see if it can use the DAC to generate usable sounds, only if I can make it work I will share changes to the schema and code.
↧
Work in progress
Dear microDrummers, my work goes, I’m currently working on several aspects simultaneously.
-New version of ConfigTool for OsX. This version will be released initially in a simplified form and only after I will add the extras including support for VST.

-In the version of Mac ConfigTool I’m also working on an interesting option that allows you to export on the iPhone/iPad the DKIT/DSND sounds libraries. Then I’ll do the same thing for the VST.
-New Interface for iPad / iPhone. Among you there is someone who has pictures (or rendering) of the individual parts of a drum set?

-Plexiglas box. What you see in the picture is a prototype to see if the measurements are correct, the final version should be done using only a few joints and screws.

Obviously I’m also working on other little things, on the compatibility with Arduino DUE, etc. …For example I would like to build a MIDI Router using Arduino ….
↧
Latency test N°1
Today I started to do some tests to calculate microDrum latency. I used a Behringer UCA 222 sound card as an oscilloscope , the software “Electroacoustics Toolbox” to analyze the signal and, for convenience, a MIDI Thru Box to split the output of the microDrum (this have certainly introduced a delay). I have connected an input between the piezo and the microDrum and the other input to one of the outputs of the MIDI Thru Box. I did several tests using various pads and different values of Scan Time. The Scan Time is the time in milliseconds where the microDrum analyzes the signal before sending a MIDI note. The first question that I have done is, how much time elapses from when the microDrum ends to sample the signal and when the MIDI note is sent?
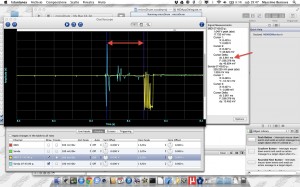
In all the tests this value is less than 1 ms. In the photo I used a Red Shot Trigger DDRUM and I set the value of the Scan Time 3 ms (as you can see it would be enough less). By analyzing the signals, the distance between the two fronts is 0.9 ms. It seems to me a very good result. Soon I will do the tests using an Arduino Due with 84 MHz ARM processor.
↧
↧
microDrum Official Box
After several studies, using different materials and different techniques, I came to a conclusion. The box you see in the gallery is the official box of microDrum.


I’ll make some corrections and then publish online the design. As you can see, is made of a single sheet of plexiglass 4mm cut by laser. The bend I made it at home. Obviously, the project will be made available online but are unsure whether to sell them in my store. Should I buy some online to make it convenient, if anyone is interested please contact me via forum / email / facebook, the price should be between € 20 and € 30.
↧
microDrum Box Design (pdf)
I added in Download page the pdf file with the design of the official plexiglass box. If you build it or do laser cutting, I would ask you to send me the photos of the result.
↧
The Italian Job (Mainboard v0.7)
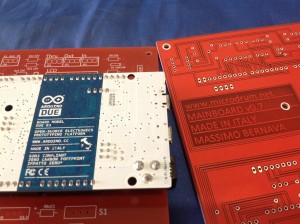
New version of the mainboard of the microDrum. This new version supports working at 3.3V Arduino boards (like Arduino DUE) and the MIDI Thru. Of course, to achieve this I had to change a bit the card but can be used in “V5 – No Thru” mode with the same components of the v0.6.
In the coming days I will publish the schema and the PDF version of the card.
↧
FAQ
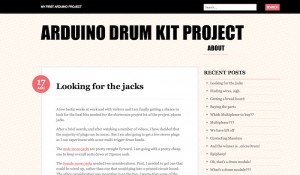
In fact they are not true FAQ, but the blog of Dave (http://arduinodrumkit.wordpress.com/) is full of interesting ideas and answers to questions that I often receive by e-mail. It is also written in proper English and not like mine :D … so I recommend everyone to give it a look.
↧
↧
The future is coming

↧
The shop is back!!!
The electrical components are come back available in the shop! Sorry for the delay… 
↧
Project Freedom
Lately I’ve been very busy. I am not on the forum, I reply to emails late and I have not released a full version of the new Config Tool. To forgive me I want to show the first microDrum that speaks!
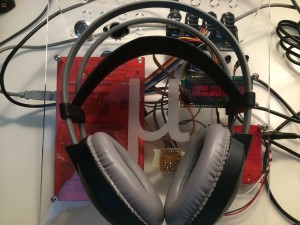
I’m very happy. It ‘s just a prototype but it works well. If all goes well in a little while you will no longer need to connect the microDrum to a PC: just turn it on, plug in your headphones and play! This is the future.
↧
New Video (I kept my promise)
Ok, this video may seem like another demonstration how much poorly I play the drum but reality shows that I was able to make a fully self-contained module for eDrum.
Hence it will no longer need to connect microDrum to PC to play but just turn it on … you can also upload your own favorites samples.
All this thanks to Jamie Robertson’s WAV Trigger (APPLAUSE!). Of course it was also necessary to rewrite the firmware of microDrum …and even some small hardware changes.
I reduced the number of buttons from three to two in order to use a digital output to connect mD to WAV Trigger.
The new firmware will be soon on GitHub, instead you have to wait for the new schema (but it is simply connect a wire from Pin 5 to WAV Trigger)
For those interested, I used these samples (I created a small program python to rename them properly).
Ok, I’m really pleased, as always, I do not earn anything (since I do not sell not even the WAV Trigger) but if you want to reward me try to spread as much as possible this news.
↧
↧
Kickstart
Dear friends, since in many ask me to buy microDrum already welded, I developed a new pcb. I called nanoDrum and has the following characteristics:
- Arduino free
- 24 inputs
- MIDI IN and MIDI OUT
- simple direct connection with LCD, buttons and Wave Trigger
I am thinking of selling it already welded (whit all components) at 50€ but to make the cards I need 150€ then, just as they do on Kickstarter, I decided to do a “fundraising”. Practically everyone who will buy the card before December 10 can choose the official color of the board between:
- White
- Green
- Red
- Blu
- Black
The color with most votes will be the official color of the card. If I get less than 3 orders I return the money to those who sent to me and the project will be postponed…
↧
Fundraising (reloaded)
…after the suggestions (thanks Wesley) I redesigned the nanodrum:
- without Arduino
- 24 inputs
- MIDI IN and MIDI OUT
- simple direct connection with LCD, 2 buttons and Wav Trigger
- expansion connectors
- shift register for the LCD (3 free digital inputs)
- USB port (for MIDI and firmware upload)
and therefore I propose again the idea of collecting funds to print the first PCBs. The use of the shift register is well documented on the internet then it will work right away, instead firmware USB-MIDI will need more time to be completed. Currently we can use the firmware MICO-MOCO that has some limitations but it works. When the MIDI-USB firmware will be complete I realize a new version of microDrum, for now I will test it only on nanoDrum.
Unfortunately with the new components, the cost rises. For the phase of fundraising I set the price at 60 €.
↧
nanoDrum Rendering
I used a very powerful 3D rendering software ![]()
↧